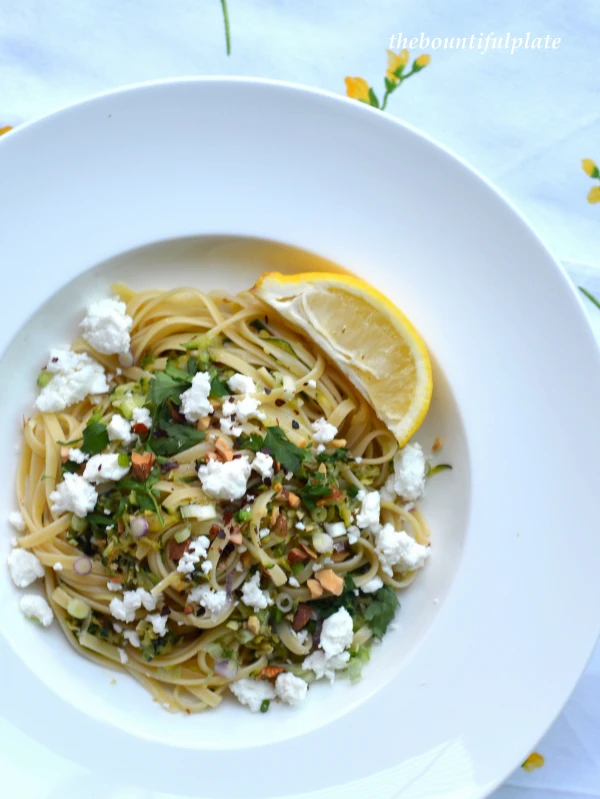
Feta cheese and courgette linguine
When we returned from the UK last month, I brought back a stack of all the food magazines I could get my hands on: BBC Good Food, Delicious, Jamie and Sainsbury’s magazine. Most of these I can purchase in Singapore, albeit at about twice the price. The Sainsbury’s Magazine though, I can’t. How I miss my British food magazines! The eager anticipation every month for the next edition. The first quick flick-through for recipes that I want to try out, then the more detailed slow enjoyment of well-written articles. Reading them on the ipad just does not do it for me. I love the feel and that soft rustle of turning the pages of a book or magazine.
Anyway, I digress.
Right. Sainsbury’s Magazine. The June edition had a cracking recipe for a crab and courgette chilli pasta but also a suggestion to make it vegetarian by substituting the crab with crumbled feta and chopped walnuts. I had every ingredient except for the walnuts so used some baked almonds instead. Worked a treat.
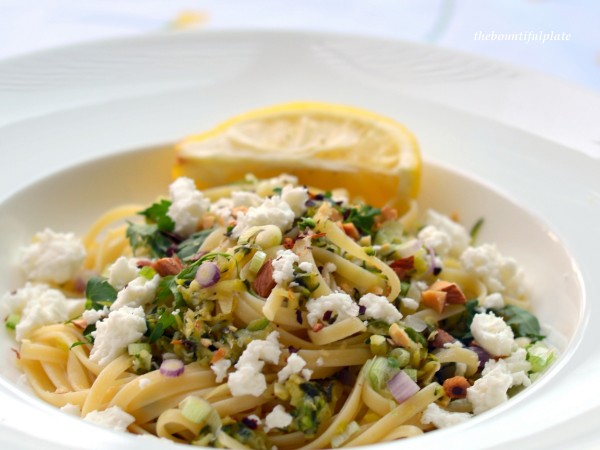
Now, feta is quite salty so hold back a little on the salt when seasoning your linguine. There’s no need to use too much of this white salty cheese produced from sheep’s milk (or a combination of sheep and goat’s milk) as the taste is quite intense. The almonds finish off the dish adding a sweet crunch.
If like me, you end up with some leftover feta cheese, you can also use it for this sweet and savoury watermelon, feta and olive salad.
To prepare the courgette – Wash then chop off the ends and cut in half across. Grate the courgette halves against the large holes of a grater, into a colander. Toss the grated courgette with 1 teaspoon of coarse sea salt. Place the colander with grated courgette over a large bowl and leave for 10 minutes. The juices from the courgette should start leaking into the bowl. Squeeze out the rest of the liquid by pressing the grated courgette against the holes of the colander with a large spoon. Set aside.
What you’ll need
- 1 large courgette, prepared as above
- 200g dried linguine
- 2 tablespoon olive oil
- 3 garlic cloves, finely chopped
- 1/2 teaspoon dried chilli flakes
- zest and juice of 1 lemon
- 2 spring onions, sliced
- a handful of parsley, roughly chopped
- coarse sea salt and black pepper to taste
- 100g feta cheese, crumbled
- a handful of baked almonds, chopped
To cook your linguine
- Bring a large pot of salted water to the boil. Add the linguine and cook according to the packet instructions.
- Meanwhile, heat the olive oil in a large frying pan, add the garlic and heat gently for 3-4 minutes without allowing the garlic to colour. Add the chilli flakes and grated courgette and sauté, stirring, for 3 minutes.
- Add the zest of lemon and spring onions. Stir for another 2-3 minutes. Turn the heat off.
- When the linguine is cooked, drain and add to the pan with the lemon juice and parsley, and toss together. Season to taste.
- Plate up before topping with the crumbled feta and chopped almonds. Toss and enjoy.
Yields 2 servings as a main course
Recipe based on the ‘Crab and courgette chilli pasta’ recipe in the June 2013 Sainsbury’s Magazine
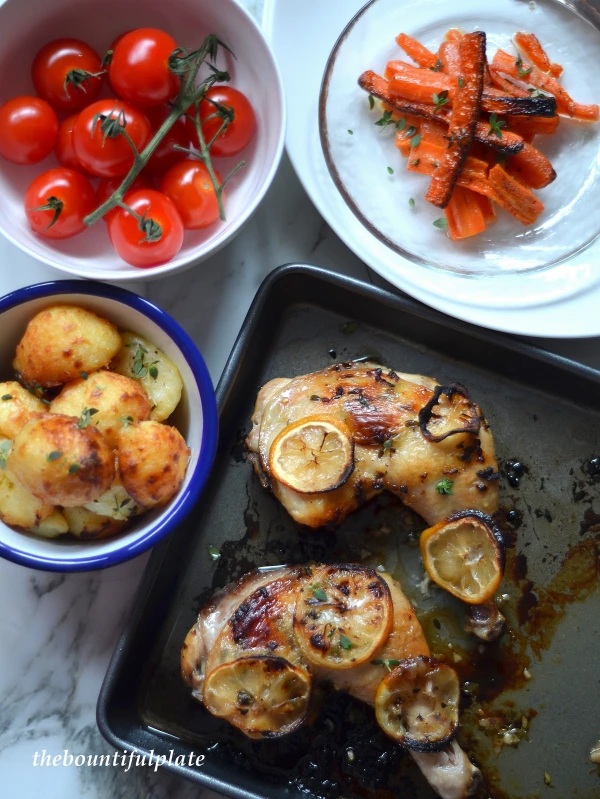
I love cooking up simple and rustic dishes, and this unassuming yet flavourful dish of roast chicken pieces fits the bill perfectly. There’s minimal preparation and the flavours from the lemon, thyme and garlic come together effortlessly.
I save roasting a whole chicken for when we have guests over – it’s just so satisfying presenting and carving a whole chicken at the dinner table surrounded by the expectant faces of family and friends. But when there are only the 2 of us to cook for, using chicken pieces is the more time-saving and convenient option.
There are plenty of roast chicken recipes out there – slow roasted for almost 3 hours ala Nigella, or firstly allowing the skin to render and brown in a hot pan – as in this Bon Appetit magazine recipe. As always with most of my cooking, I wanted something easy to prepare and with minimal cleaning after, so the recipe that follows does the trick.
To enhance the lemon and garlicky flavours, I prepared the chicken an hour before roasting. While the chicken was waiting to be roasted, I moved on to preparing the vegetables.
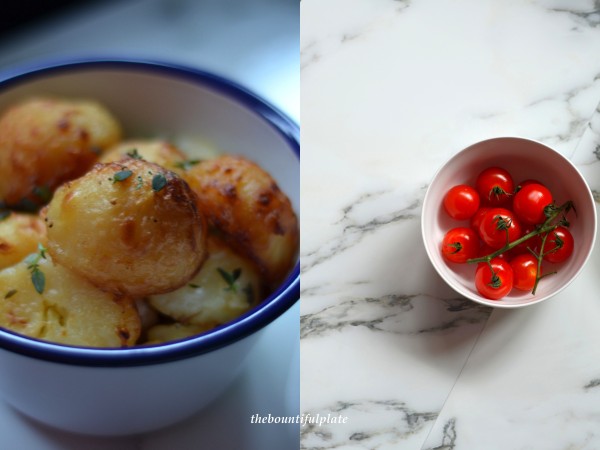
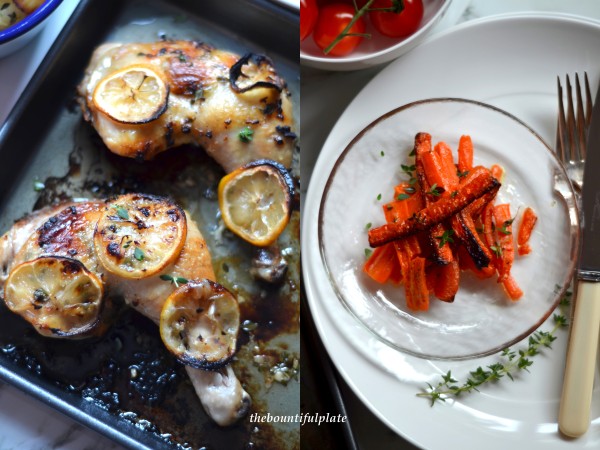
The roasting time for the chicken will vary depending on the size of your chicken pieces and how closely packed they are placed on the roasting dish. You can use all thighs or as I did, chicken legs. I set the vegetables to roast on the bottom rack in the oven for 30 minutes, then the chicken pieces on the middle rack for the last 30 minutes so that everything could be done at around the same time.
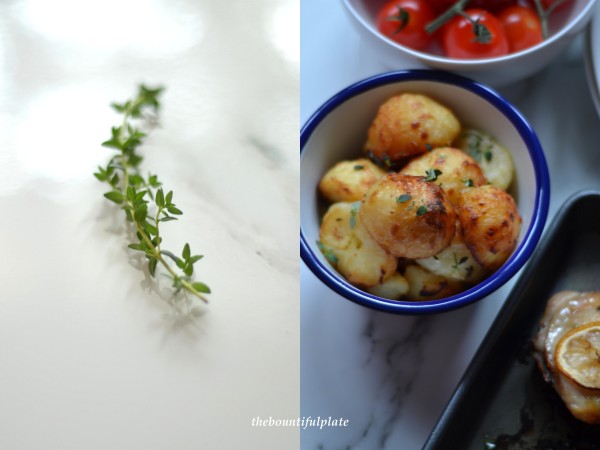
Lastly, I removed the tiny thyme leaves from their stems by pulling the stems through my fingers from top to bottom, against the direction of the stems. Six average sprigs will yield about a tablespoon of leaves.
What you’ll need
For the roast chicken pieces
- 1 lemon
- 2 cloves of garlic, finely minced and pressed with the back of a knife
- 1 tablespoon of fresh thyme leaves
- 4 tablespoons of olive oil
- coarse sea salt and pepper to taste
- 2 chicken legs (or 4 pieces of chicken thighs)
For the roast potatoes and carrots
- 5 medium potatoes, peeled and halved
- 2 carrots, peeled and cut into batons
- olive oil for roasting
- 3 cloves of garlic, skin on and smashed with the back of a knife
- 1 tablespoon of fresh thyme leaves
- coarse sea salt and pepper to taste
Preparing the chicken pieces for roasting
- Slice half the lemon thinly and set aside. Squeeze the juice of the other half into a small bowl. Add the garlic, thyme leaves and olive oil, along with a good pinch of salt and pepper. Give the mixture a good stir.
- Set the chicken pieces skin side up, on a roasting dish and rub the mixture into the chicken pieces. Top with the lemon slices, cover with cling film and set aside for an hour.
To roast your potatoes and carrots
- Preheat your oven to 200°C.
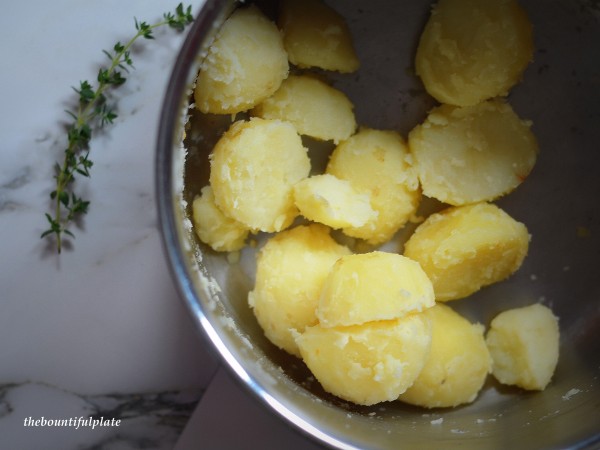
- Put the potatoes and carrots in a large pot of salted, boiling water on a high heat and bring back to the boil. Allow to boil for 10 minutes.
- Drain in a colander and allow the vegetables to steam dry. Take the carrots out and set aside.
- Return the potatoes to the empty pot and fluff them up by shaking them around a little so that they will have crispy bits when they’re cooked.
- Put a medium roasting dish over a medium heat and add a few generous glugs of olive oil to the dish. Add the garlic and thyme leaves, saving about a teaspoon of thyme leaves to garnish the roasted chicken pieces and vegetables before serving.
- Put the potatoes and carrots into the dish with the salt and pepper; stir them around to coat in the flavours. Spread them out evenly in one layer.
- Roast the vegetables in the preheated oven for about 1 hour, or until golden and crispy.
To roast your chicken pieces
- Remove the cling film covering the chicken, add a final light sprinkling of sea salt and roast for about 30 minutes.
- Remove the roasted chicken pieces from the oven together with the potatoes and carrots. Garnish with some thyme leaves. Sprinkle a small pinch of coarse sea salt on the potatoes. Serve with some fresh cherry tomatoes for a simple happy meal.
Yields 2 servings

2 months. Has it been that long since my last post? It wasn’t intentional. Honest.
In 2 months, I’ve been back in the UK for a couple of weeks, went away for work a week and in between, tried to convince myself not to miss London too much and try to settle back into life in Singapore. Keeping busy helps and work is definitely doing that for me, with more travelling planned for the rest of the year. It’s all good and I’m trying not to forget about eating healthily despite mine and Chef K’s busy schedules.
Here’s a vegetarian pasta dish I cooked, shot, served and chomped down in less than an hour. So simple and effortless – the short recipe follows. Try using the sweetest cherry tomatoes you can find – they totally make the dish.
What you’ll need
- 400g pasta (I’ve used fusilli but feel free to substitute with any other short pasta like penne or farfalle)
- Olive oil
- 3 large cloves of garlic, peeled and thinly sliced
- 2 medium onions, peeled and thinly sliced
- 300g cherry tomatoes, halved
- a pinch of dried chilli flakes
- a pinch of dried mixed herbs
- 100g baby spinach leaves, rinsed well and roughly torn
- extra virgin olive oil
- 4 tablespoons of grated parmesan
- sea salt and black pepper to taste
- 1 lemon, quartered
How to make your pasta
- Bring a medium pot of water to the boil and cook the pasta according to packet instructions until al dente. Drain well and set aside, reserving about a cup of the cooking water.
- Heat the olive oil in a large pan over medium heat, sauté the garlic and onions until slightly golden.
- Add the cherry tomatoes, chilli flakes and dried herbs and stir-fry for a few minutes until the tomatoes have softened.
- Turn the heat off. Add the cooked pasta to the pan and toss to make sure the pasta is coated with all the ingredients. Toss in the spinach and stir until some of the spinach wilts. Add some of the cooking water if the pasta looks a little dry, together with a little extra virgin olive oil. The pasta should look glazed.
- Stir in 2 tablespoons of the grated parmesan. Season with salt and black pepper.
- Plate up the pasta, sprinkle the remaining parmesan, finish off with more black pepper and a squeeze of lemon juice.
- Enjoy in front of the telly with a glass of wine.
Yields 2 servings for dinner with leftovers for packed lunch the next day.

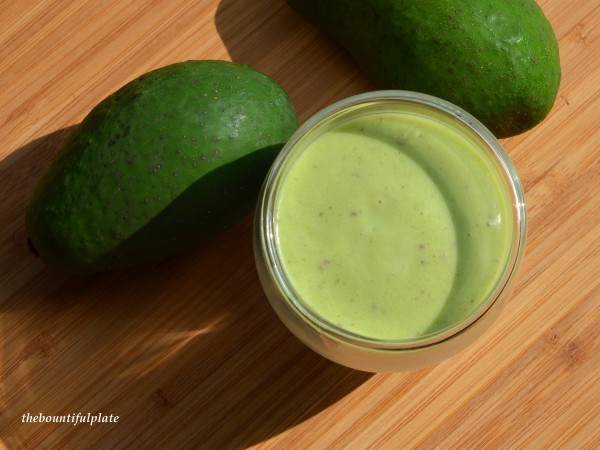
Avocado and cranberries smoothie
Sometimes, eating out and eating healthily in Singapore is not easy, something which Chef K and I discovered a few months after our relocation here. Sure, there are lots of good food, but most of what is sold in food centres, where you can generally find the cheapest fare, can hardly be labelled ‘healthy’. There’s a lot of fried food, some laden with MSG which leaves me really thirsty after consumption and one can never be too sure about the quality of the ingredients.
Healthy food does not come cheap either – a standard salad or soup costs double of that of a local dish of noodles or rice. So in the last few months, I’ve been trying to work in some healthy snacks and breakfasts into our diets – nothing complicated, like this avocado and cranberries smoothie.
Avocados are high in protein and oil. In fact, this soft-fleshed fruit can contain up to 30 per cent fat. Don’t worry though; avocados contain only monounsaturated fat, that’s good fats – which may help to reduce the risk of cancer and heart disease. Cranberries are high in Vitamin C and antioxidants making this smoothie an all round healthy winner. Oh, and the crushed ice in the recipe below makes it God-sent in this hot and humid weather!
When shopping for dried cranberries, try looking for those that are sweetened with apple juice and not sugar. Not a lot is used in this smoothie but if you are eating them quite frequently as part of your diet, it’s better to choose the ones not sweetened with sugar.
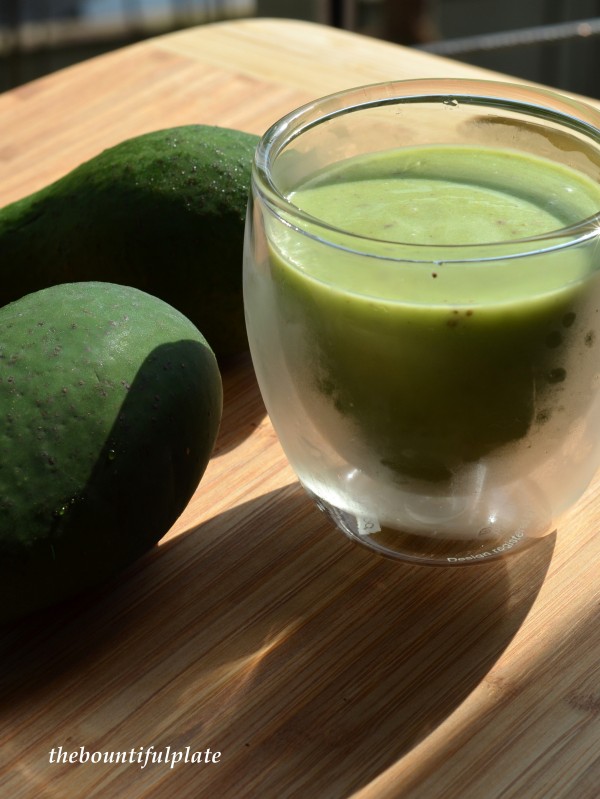
Avocado and cranberries smoothie
What you’ll need
- 1 ripe avocado, halved and pitted
- 1 teaspoon lime juice
- 250ml skimmed milk
- 1 tablespoon dried cranberries
- 2 teaspoons honey
- A handful of ice cubes
To make your avocado smoothie
-
Scoop the flesh from the avocado into a bowl and coat with the lime juice.
-
Add the avocado, milk, dried cranberries, honey and ice cubes into a blender; blend until smooth and thick, a couple of minutes should do the trick.
- Pour into glasses and serve immediately.
Yields 2 medium servings of smoothies
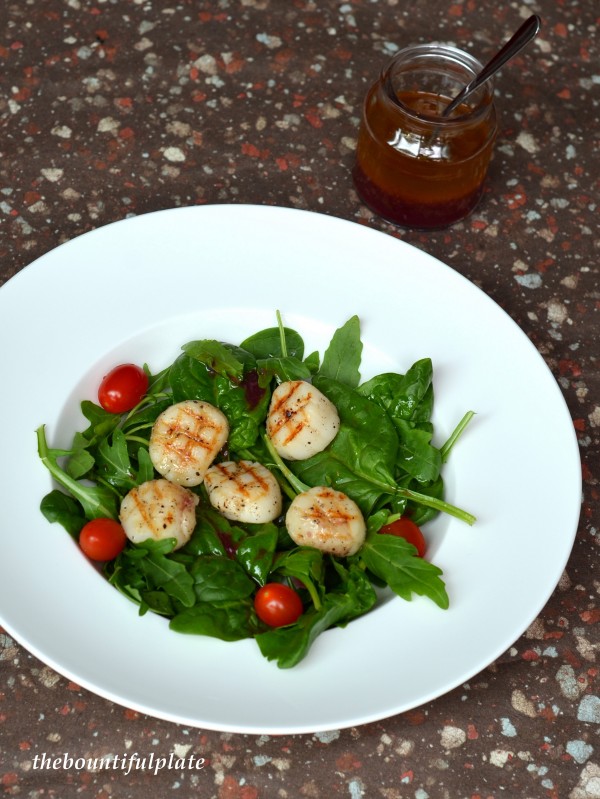
Seared scallops salad with blood orange vinaigrette
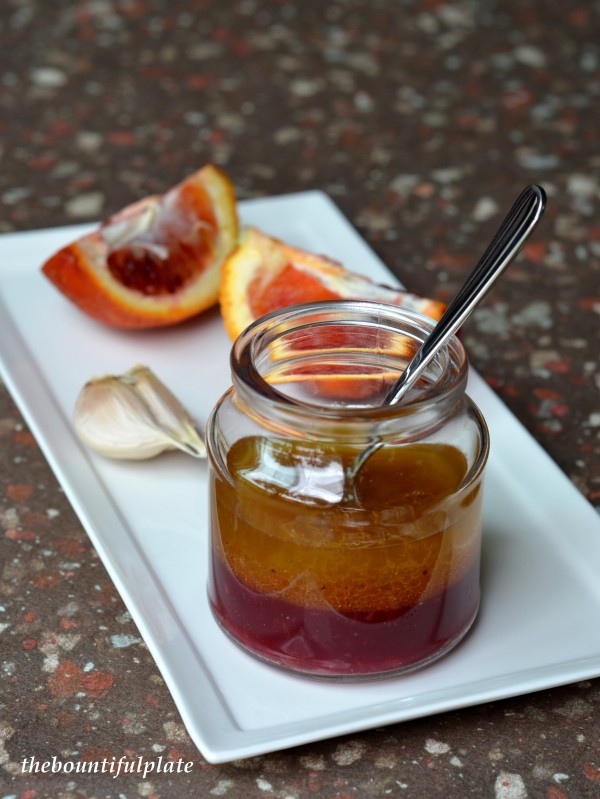
Every once in a while, I come across a recipe from one of the lovely blogs I follow which makes me go “Wow! I need to make that dish NOW!”. Then I’ll look at the ingredients and be disappointed because a key ingredient would not be easily available in Singapore or would cost an unjustifiable amount, no matter how delicious the recipe appeared to be. That’s what happened when I saw this simple but eye-catching recipe for a blood orange vinaigrette on Helene Dujardin’s blog Tartelette. As always, Helene’s photos were beautiful and inviting – the pop of bright colours of the blood oranges was enough to make me want to sink my teeth into some blood oranges right there and then!
As luck would have it though, that week I spotted some blood oranges from the US at a local supermarket (and again this weekend just gone so I’ve bought more), and they didn’t cost me too much either, just a little bit pricier than normal oranges. I was all set to whisk up some of Helene’s vinaigrette.

I love trying out new homemade salad vinaigrettes and this one paired perfectly with the seared scallops (as suggested by Helene in her post) and greens I put together. I’m not one for store-bought salad dressings which are generally full of refined sugars and salt which to me, completely defeats my purpose of eating a salad in the first place, that is to try eating healthily! So, if you are shopping around for beautiful, fresh vegetables and fruits to put together a feel-good nutritional salad, make sure to whisk up an equally healthy salad dressing to go with it.
This dressing fits the bill and is so easy to make – no food processor or special kitchen equipment required, just a small whisk or a fork if you don’t have one. There’s no excuse not to make this vinaigrette really, unless of course if you can’t find the star ingredient where you are! The citrus base from the blood orange juice made for a light and sweet vinaigrette that was just about right with the scallops, perfectly seared by Chef K.
Please check out Helene’s recipe for her blood orange vinaigrette. To get a 1/4 cup of blood orange juice, I needed one large orange.
What you’ll need
- 10 medium scallops, shelled
- 1 tablespoon olive oil
- black pepper and sea salt to season
- Helene’s blood orange vinaigrette
- salad leaves of your choice – I used baby spinach and rocket
- cherry tomatoes
To make your salad
- Coat the scallops with olive oil and season slightly with black pepper. This can be done 1-2 hours in advance to allow for the oil to be absorbed (reduces sticking and spitting when cooking).
- Whisk up Helene’s vinaigrette and set aside.
- Heat a griddle pan (or small frying pan) until smoking hot, sprinkle some sea salt on the scallops just before searing them for about 1 minute to 1 1/2 minutes on each side. Check that the scallops are done by pressing lightly with your finger. They should give a bit of bounce and resistance. Remove the cooked scallops from the pan and set aside.
- Arrange your choice of salad leaves and cherry tomatoes on individual plates, place the scallops on top and drizzle with the blood orange vinaigrette.
Yields 2 servings as a light meal
Note: I had plenty of vinaigrette leftover which I poured into an airtight glass container. It should keep well in the fridge for 3 days.

Hello! Are you starting to think I’m turning Korean – what with my kimchi fried rice last week and now, another Korean recipe? No, seriously, I’m still very much oriental on the outside, rather reserved like the Brit that I am and a little less Malaysian each day on the inside with a stomach that’s missing the food of London but learning to adapt to what comes its way in Singapore. Basically, yes, I’m rather confused but hey, that’s me.
Where was I? Oh yes. Another Korean recipe. As I said in my previous post, I don’t have much experience with Korean food. I’ve just never really been properly introduced to it. But I’ve been to a couple of Korean restaurants now with my colleagues and what struck me at these meals was not so much the main courses we had but the side dishes that came with them. During one meal where we ordered a rice or noodles dish each, we had 7 side dishes to share between the 3 of us – rolled egg omelette, kimchi, spinach, potatoes, peanuts, baby anchovies and spring onions!
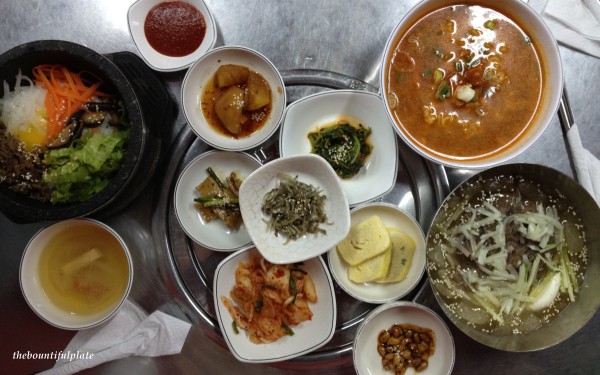
What I was most interested in replicating at home is not shown in the photo of our meal above, but is something which I’ve had at other Korean meals – Korean jap chae. This dish is made up of Korean sweet potato noodles, also known as ‘dangmyeon’ in Korean, and generally stir-fried in sesame oil with julienned carrots, thinly sliced mushrooms, spinach and marinated beef. Traditionally, each vegetable and meat topping is cooked separately and then mixed together with the noodles in the end. The noodles have a texture unlike any other I’ve ever had – springy and chewy with just the right amount of bite, if cooked properly. It’s tasteless on its own and absorbs the taste of the toppings and seasoning mixed in.
I’ve made my version here meatless. Kimchimari made hers with beef and in the traditional way – she’s also got a great blog full of Korean recipes which I’ve been exploring.
Hope you’ll enjoy this easy dish and have a great week ahead!
Korean jap chae
What you’ll need
- 3 tablespoons soy sauce
- 1 teaspoon sugar
- 3 teaspoons sesame oil
- 100g dried Korean sweet potato noodles
- 2 tablespoons of vegetable oil
- 2 cloves of garlic, finely minced
- 1 onion, sliced thinly
- 1 large carrot, julienned
- 3 stalks of spring onions
- 4 tablespoons of reconstituted wood ear mushrooms, sliced thinly (alternative: shittake)
- 150g baby spinach, washed well and drained
- 1 teaspoon sesame seeds
How to cook your jap chae
- In a small bowl, mix the soy sauce, sugar and 1 teaspoon of sesame oil together. Set aside.
- Half fill a medium saucepan with water and bring to a boil. Add the noodles and cook according to packet instructions, 7 minutes on mine, or until the noodles become clear.
- Drain immediately, rinse in cold water and drain again. While the noodles are still warm, toss with the remaining sesame oil so they don’t stick together. Cut the noodles into shorter pieces so they are easier to eat. Set aside.
- Heat up the oil in a wok on high heat. Fry the garlic, onions and carrots until just softened. Add the spring onions and mushrooms, and continue frying for another minute or so. Then add the spinach, soy sauce mixture and noodles. Fry for another 2-3 minutes until the noodles have soaked up the sauce and flavours of the other ingredients. The noodles will turn a little brown in colour.
- Plate up the noodles and garnish with the sesame seeds. Toss and enjoy!
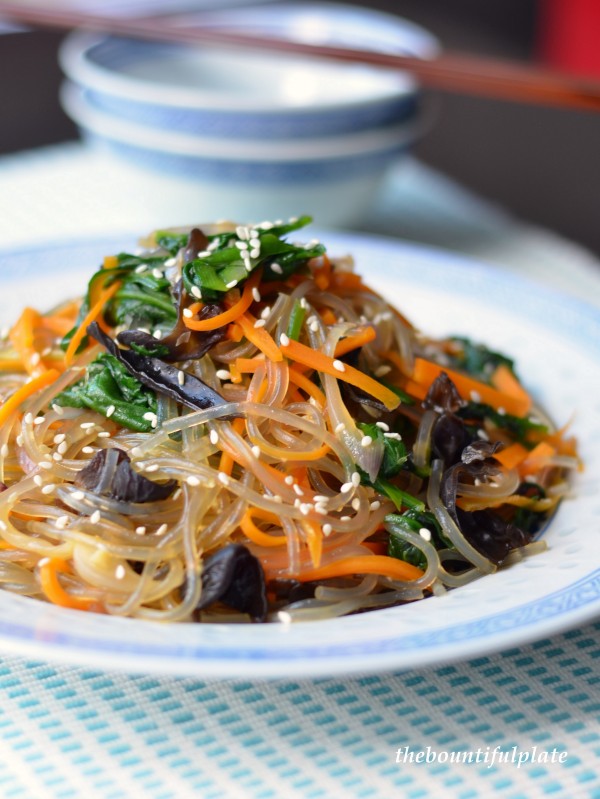
Yields 2 generous servings as a main course or 4 side servings
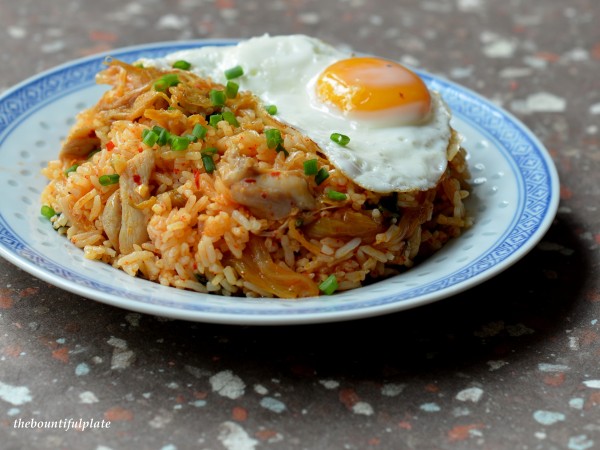
Recipe for kimchi fried rice
Truth be told, I am writing this and I am absolutely knackered. I have just run my second half-marathon in Singapore. The first one I ran was in December last year and I don’t remember it being so painful after! My lower back is aching, my calf muscles are going into occasional spasms and the heat really got to me this time. At one point towards the last kilometre, I thought I was going to pass out from the intensity of the morning sun. Lesson learnt – do not underestimate the power of the sun!
I had grand plans for this long Easter weekend – baking, cooking, more recipe testing… I didn’t get to do everything I wanted to but did manage to finally come up with a really good avocado smoothie recipe which I’ll hopefully share soon and this kimchi fried rice.
Kimchi is fermented vegetables, generally cabbage, seasoned with salt, Korean red pepper powder, garlic and ginger. It can taste quite spicy and tart, a combination that may not be pleasant to many. I don’t have much experience eating or cooking Korean food. I do know that kimchi is generally served as a side dish with most Korean meals I’ve had. Whilst on its own it can be a little daunting to eat, I decided to try making kimchi fried rice after reading justcooknyc’s version here. I had some chicken thighs sitting in the freezer which needed to be used up so added them to my fried rice, but David Chang of Momofuku goes on about how amazing bacon and kimchi in fried rice tastes and Orangette has what looks like a good recipe here.
The kimchi fried rice turned out really well – not too spicy, even without bacon and butter (need to watch the fat content here!) and I loved the orange tinge the kimchi leant to the rice.
Whilst many say you should use cooked rice that’s a day or two old for fried rice, I find that fluffing up the rice after it’s cooked and leaving to cool to room temperature works just as well.
Kimchi fried rice
What you’ll need
- 3 small chicken thighs, de-boned and cut into 1 cm cubes
- 1 teaspoon sesame oil
- 1 tablespoon light soy sauce
- vegetable oil for frying
- 2 cloves of garlic, minced
- 3 shallots, finely sliced
- 2 cups of cooked rice at room temperature
- 200g of kimchi, chopped into bite size pieces if required
- salt and pepper for seasoning
- fried egg to finish off
- chopped green spring onions or chives for garnish
To make your kimchi fried rice
- Put the chicken thighs, sesame oil and light soy sauce in a bowl and toss. Allow to marinade for 30 minutes.
- Heat the oil in a wok over high heat. Add the garlic and shallots, stirring until cooked, but not brown.
- Add the chicken and stir-fry for a couple of minutes until cooked.
- Add the rice, breaking up the clumps and fry for another couple of minutes.
- Add the kimchi and stir-fry until all the ingredients is mixed throughout the rice.
- Season with salt and pepper if required. The kimchi can be quite salty already so always taste before seasoning.
- Plate up and serve with a fried egg (highly recommended) and garnish with chopped green spring onions or chives.
Yields 2 servings for dinner with leftovers for packed lunch the next day.
Celebrating simplicity with a butter loaf cake

Now that I’ve started writing here again, I’ve also started going through some of the food blogs I subscribe to. I’m talking about a hundred food blogs or so here. The thing is, there are so many foodblogs out in the blogosphere. If I were to hazard a guess, I’d say it’s in the tens of thousands. Some are really good, others mediocre and yet many more are really unappealing. The ones that tick the boxes for me do so because they do one or all of three things – they are informative; carry warm, beautifully shot photos; or are written in a style I can relate to.
See, I’ve been trying to find my voice in my writing and with that, the direction of thebountifulplate going forward. Given that I do have a day-job, what do I have time for? Do I play around more with recipes, try to develop a more eloquent writing style that reflects my personality or learn to take better photos? Do I pay someone to develop a better-looking blog for me – but what’s the point in that if the contents are not up to par? What angle do I write from – that of a part expat (part because my husband hails from this corner of the world) in Singapore sharing her stories of her new life here?
I don’t have an answer, just a load of questions. But hopefully I will explore some of these ideas in the coming months, maybe shake my style up a little bit and see where it takes me. I’ve already had so many positive experiences through this little blog of mine, it doesn’t matter the number of visits I get here or if I get freebies. I simply wish to continue enjoying the blogging process – to learn, savour and laugh!
Anyway, I’m not just here to ramble. I also wanted to tell you that I baked. After packing up and moving over to Singapore for over 14 months, I finally baked. Remember last year when I made these no bake Oreo chocolate cherry tarts because I was ovenless? Confession, I’ve had an oven for the last 4 months. I could give you a good few silly excuses as to why but the bottom line is, I’ve been lazy. Then I got scared: What if I don’t know how to bake anymore?
So I chose a really simple recipe to bake from. Nothing fancy, and certainly not my own creation. Just a good ol butter loaf cake. I took out my trusty Kitchenaid mixer, bought a few ingredients and I baked. Last weekend, our home was filled with that gratifyingly delicious scent of baking cake and my heart with simple joy that I haven’t yet lost my baking mojo. I celebrated.
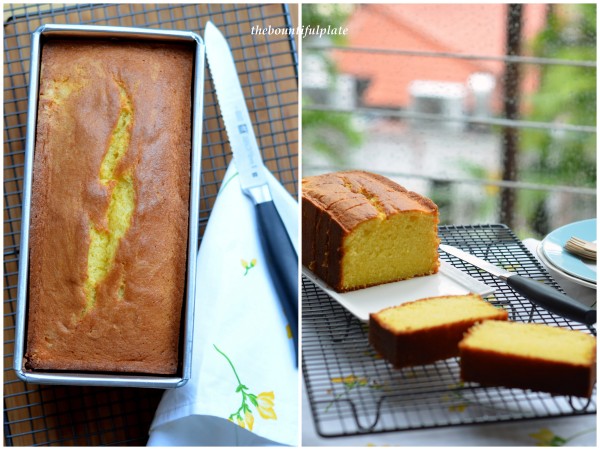
Please head over to Rasa Malaysia by Bee for her recipe of this delicious cake.
Note: I used a loaf tin measuring 23.5 x 8 x 10.5cm. The batter filled just over half of the loaf tin and baked to just about that size. The cake stores well in an air-tight container for about 3 days.
Have a great week ahead, you!
Recipe for my happy minestrone soup

If you kindly subscribe to my blog you may notice that this is my third blog post in as many weeks. After a 6 month hiatus. You know how that saying goes: You wait for a bus for ages and none arrive. When they do, they all come at the same time. I’m hoping my blogging will not take after this pattern but if it does, feel free to email me and give me a kick. Er.. please.
So, why am I making soup again? Some of you will know that this is the lunar year of the snake and that this new year was ushered in, by all those who celebrate it, a few weeks back. Traditionally, these celebrations last for 15 days. This was always a quiet affair for me in London but this year, K and I joined in the festivities with his family. There was a lot of eating – various goodies (cookies, crackers, cakes) specially made over the period; family dinners with too many dishes to count and more snacking whilst visiting our relatives.
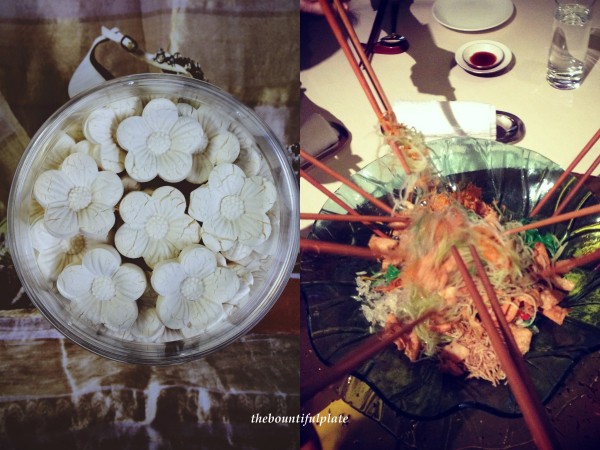
The photo on the left is of a traditional cookie called ‘kueh bangkit’ and on the right, we observed the tradition to ‘lou hei’ or toss-up with a Chinese-style salad of sorts. With all this good food, I needed to bring some balance back to my diet (read: my skirts were getting too snug for comfort!). I figured a healthy soup was required and rustled up a big pot of minestrone soup for a few days’ worth of packed lunches at work. My choice of soup worked brilliantly – it kept well in the fridge for 3 days with the flavours developing beautifully.
It’s also the kind of cooking I like – not a lot of finesse required, whack all the ingredients in a big pot and let it do its own thing. I love how all the colours of the vegetables come together, it just puts a smile on my face when I see this beautiful pot of soup cooking away. You can use almost any sort of vegetable you fancy – if you’re in a seasonal country, try using fresh vegetables that are in season. Some recipes throw in bacon, browned at the start (oooohhhhhh….), whilst others finish with pasta or risotto rice (this is also a really good article on how to make a good minestrone soup).
Keep it versatile, make it your own. Be happy.
What you’ll need
- olive oil
- 2 small onions, chopped
- 4 cloves garlic, minced
- 2 sticks of celery, cut into 1cm dice
- 2 carrots, cut into 1cm dice
- 1 large potato, cubed into 1cm dice
- 1/2 cup green peas
- 1 can red kidney beans, drained
- 1 can small white beans, drained
- 1 can diced tomatoes
- 1 litre chicken/vegetable stock
- 1 teaspoon dried mixed herbs
- 1/2 teaspoon dried chilli flakes
- 1 teaspoon sea salt
- black pepper
- 1 cup hot water
- 150g fresh baby spinach
- Heat a large pot over medium heat and add a lug of olive oil. Fry the onion, garlic, celery, carrots and potatoes for about 15 minutes, stirring now and then, until the vegetables have softened.
- Add the green peas, kidney beans, white beans, tomatoes and chicken/vegetable stock, then cover with a lid and bring everything slowly to the boil. Turn the heat down and simmer for about 30 minutes.
- Throw in the herbs, chilli flakes and season with salt and black pepper. If the soup is a little bit too thick for your liking, add 1 cup of hot water to it.
- Add the baby spinach leaves, cooking an additional 20 minutes. Check you’re happy with the seasoning, then serve. Enjoy!

Recipe for watermelon, feta and black olive salad
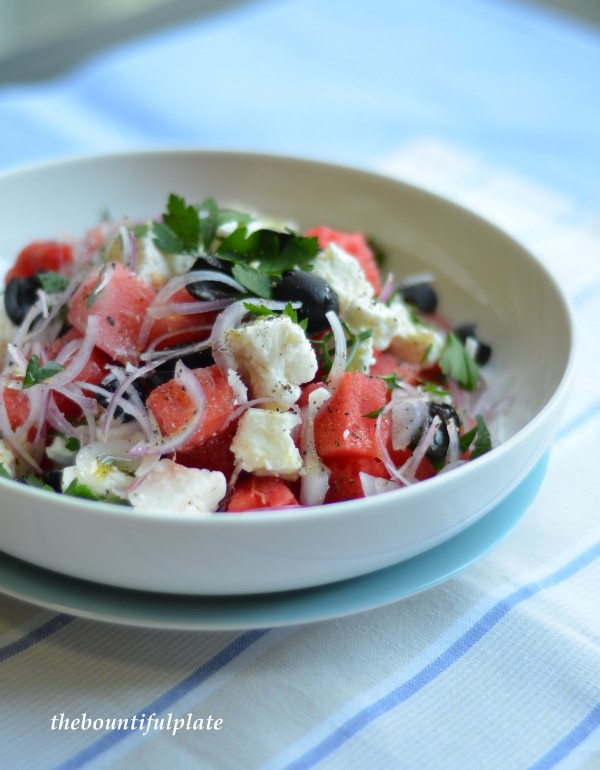
Watermelons are sold in abundance here, so is ice-cold watermelon juice. Both are heaven-sent in Singapore’s hot climate. Along with sugarcane juice, watermelon juice makes it to the top of my list as a hot weather thirst quencher.
But watermelon in a savoury salad?
Surprise, surprise – it works! The sweetness of the watermelon (and you must try to find one that’s really sweet) provided a lovely contrast to the salty olives and sharp onion (Nigella says soak it in lime juice to reduce the rasp) . Throw in the creamy feta and tartness from the lime juice. Oh, it was so refreshing and so welcome in this heat!
Some recipes online throw in some fresh mint as well or toss the salad with some greens and balsamic vinegar – just some ideas to get you going on this cool salad. It wasn’t exactly a hit with my husband but I would definitely make this again!
What you’ll need
- 1 small red onion, halved and sliced thinly then soaked in 2 tablespoons of lime juice
- 1kg of watermelon, cut into 2cm cubes
- 200g feta cheese, crumbled to about the same size as your watermelon
- a handful of flat leaf parsley, chopped
- 100g black olives, pitted and sliced in half
- 3 tablespoons of extra virgin olive oil
- 1 teaspoon of lime juice (use the lime juice used to soak the onion slices)
- Black pepper
How to put your salad together
Simply put the onion, watermelon, feta, parsley and olives in a large, wide shallow bowl. Lightly toss with the olive oil and lime juice. Add a good few grinds of black pepper and Bob’s your uncle!
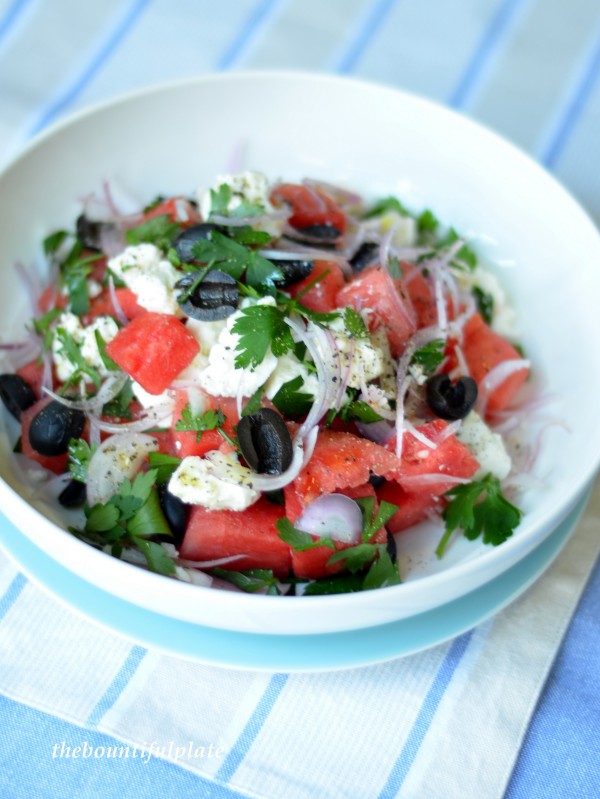
Yields 4 starter size servings

